
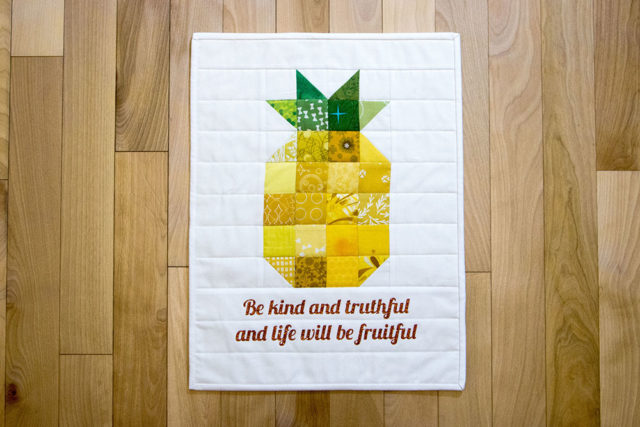
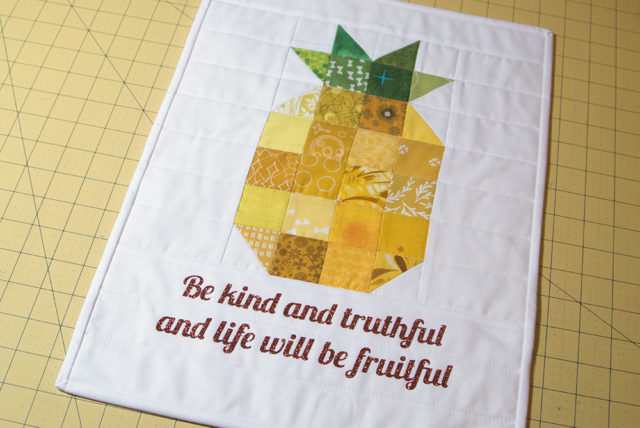
Last week I made this mini quilt for Emma’s teacher as a Teacher Appreciation Week gift. It came together really quickly — I made the pineapple on Tuesday night, quilted it and did the lettering on Wednesday night, and finished up the binding on Thursday night — and I loved the result!
Although my final product is totally different, this project actually started way back in the fall when I bought this Sew Quirky pattern at Quilt Festival. It features a cute hexie pineapple that I planned to use as a starting point, even though the saying would be different. I started basting hexies and was almost finished…and then I totally changed my mind! I wanted Emma’s teacher to be able to hang this in her classroom, and the banner with hexies was going to be fairly large. And then of course time was another factor — I only had a few days to get something done. So I switched things up, un-basted all my hexies, and got back to work.
As I was making it, I posted some bits of the process on my Instagram stories and got a few questions, so I thought I’d write up a quick tutorial in case you want to make one of these yourself! It’s fairly high level, so if you have questions about any of the steps just let me know in the comments.
How to Make a Pineapple Mini Quilt
Finished Size: ~14″ x 17″
Materials:
For the mini quilt: Mini charm squares or scraps of yellow and green fabric, a fat quarter of background fabric, a fat quarter of backing fabric, a few 2″ strips for binding, and batting.
For the lettering: Silhouette (or other) cutting machine, heat transfer vinyl in a color of your choice, and the template file.
Step 1. Make the pineapple block! I used a free pattern by Jackie Padesky with one change — instead of using 2.5″ squares to finish at 2″, I used 2″ squares to finish at 1.5″, so once sewn together my finished block was 6″ x 10.5″. For the half square triangles (leaf points and pineapple “corners”), I used 2.5″ squares cut in half diagonally, sewed the colored triangle to a background triangle, and then trimmed each finished HST unit to 2″ square.
Step 2. Frame the pineapple block with more background fabric. First I attached 4″ strips of white to either side of the pineapple. Next I added a a 2″ strip to the top and a 5″ strip to the bottom. That completes the top of the mini!
Step 3. Baste and quilt! I used the same solid white Kona cotton as my backing and a large-enough batting scrap. I was pretty time crunched so I kept the quilting extremely simple with straight horizontal lines spaced 1.5″ apart, but it would be fun to do something fancier too.
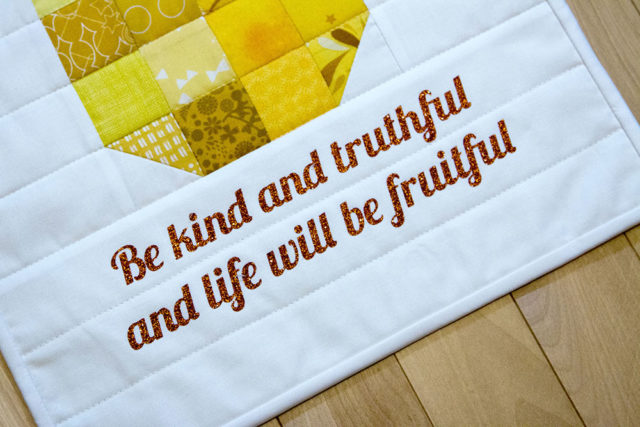
Step 4. Time to cut the quote! I thought about embroidering the letters but again, I didn’t have time for that if I wanted this to be a Teacher Appreciation Week gift so I went back to the drawing board and realized I could use my Silhouette! I’ve used it for vinyl once before — to make vinyl stickers to put on plastic water bottles for birthday party favors when Emma turned 4 — but I hadn’t used the heat transfer vinyl that has become so popular for t-shirts and other fabric applications. I ordered some Silhouette glitter heat transfer vinyl in copper from Amazon, and got to work.
I used Adobe Illustrator and Silhouette Connect to generate and cut my file, but I’ve saved it in 2 formats that will hopefully be useful for anyone wanting to recreate my version. Here is a DXF file that can be opened in the Silhouette software and here is a PDF. Note that the PDF is the correct size (~8.5″ wide like you see on my mini above) but every time I open the DXF file it comes up bigger for some reason — so make sure you resize as needed using whatever software your cutting machine uses! (And remember that the file has the text in reverse for the cutting, so that it will read correctly once you flip it over and apply it to your fabric!)
The vinyl I got comes in a roll that feeds directly into my Silhouette. (If you’re using a different product or a different cutting machine, you’ll obviously have to figure out how your machine or product works.) I had a couple false starts before finally getting a good cut on my third try. On my first attempt, the bottom of the second line of text didn’t get cut out correctly because the top of my vinyl roll — which was curled up from being rolled up in the packaging tube — got pushed against the rubber “track” of the cutting blade and interfered with the blade’s movement. I fixed this by rolling the vinyl the other way to flatten out that curling. I easily could and should have done this from the start, but just didn’t think about it.
On my second attempt, all the lines got cut but the cut wasn’t clean enough and removing the excess vinyl from the transfer plastic was difficult and resulted in some tearing. I had used the recommended settings for the heat transfer vinyl but after this attempt, I went up one setting on the blade (from a 5 to a 6) and also clicked the “double cut” box so that the blade passes over every cutting line twice.
The third try was successful! Woo!
Step 5. Apply the quote to the mini quilt. After removing all the excess vinyl from the transfer plastic, it was easy to just flip it over and carefully line it up where I wanted — you’ll notice that I decided to have the quilting line run between my lines of text, so that the vinyl had nothing but solid fabric to adhere to. Take the time to get it lined up just right, because unlike stitching, this step can’t be easily undone!
I used some scrap muslin as a pressing cloth and, according to the instructions on the vinyl packaging, I pressed it pretty hard with high heat from my iron (and no steam) for 45-60 seconds. After that, the plastic peeled right up leaving my lovely glittery quote fused in place! Choosing the glitter vinyl was a spontaneous decision but I’m so glad I did.
Step 6. Apply binding to finish! I suppose you could also bind the mini quilt before adding the vinyl text, but I waited until the end. Do whatever works for you!
And voila! You now have a lovely mini quilt to hang wherever you want. I had a lot of fun putting this together, and especially playing with the heat transfer vinyl for the first time. And while I’m actually not a fan of the feel of this kind of vinyl on clothing, I can see sooooo many ideas for using it on wall hangings or other little projects.

Very nice! I like the way the lettering adds to the mini.