Hello, and welcome to day 6 of the 2022 Back to School Blog Hop! As a pattern designer and tech editor, I spent a LOT of time doing quilt math — and it is honestly one of my favorite parts of the entire quilt-making process. I love doing the puzzle-solving required to piece a quilt together and figure out how much fabric I’ll need to turn my designs into reality.
But regardless of your design, there are two things every quilter needs to know: how much fabric do you need for backing, and how much fabric do you need for binding? Both of these can be quickly calculated, and all you need to know is the width and height of your quilt top.
I’ll walk through the calculations below, but if you want to skip that part entirely and go straight to the punchline, I’ve made 2 handy-dandy FREE cheat sheets that you can grab for yourself below. (If you’re already on my list, you should have received these cheat sheets in your inbox this morning!)
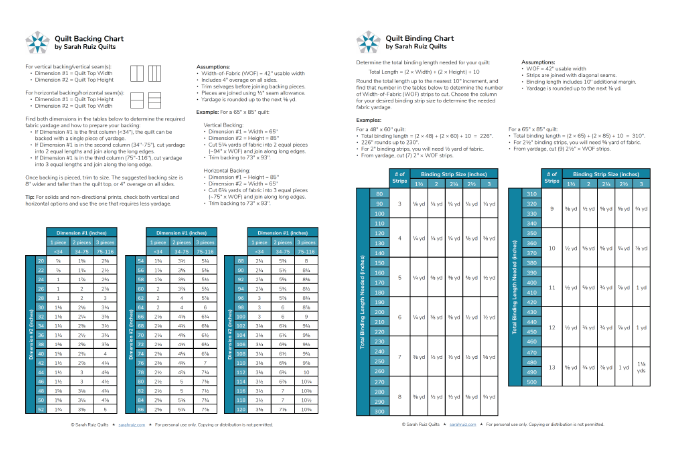
Assumptions
For the calculations below, I am making several standard assumptions.
- Width of fabric (WOF) is at least 42″ of usable width.
- For backings, pieces are joined with 1/2″ seam allowance, and you want at least 4″ overage on all sides of the quilt top.
- For binding, strips are joined with diagonal seams, and 10″ is added to the needed binding length for margin.
- All yardage amounts are rounded up to the next 1/8 yard increment.
How to Calculate Quilt Backing
First, you’ll need to choose whether you want your backing to be oriented vertically or horizontally. This will affect both the direction of your fabric print and the direction of your backing seam(s).
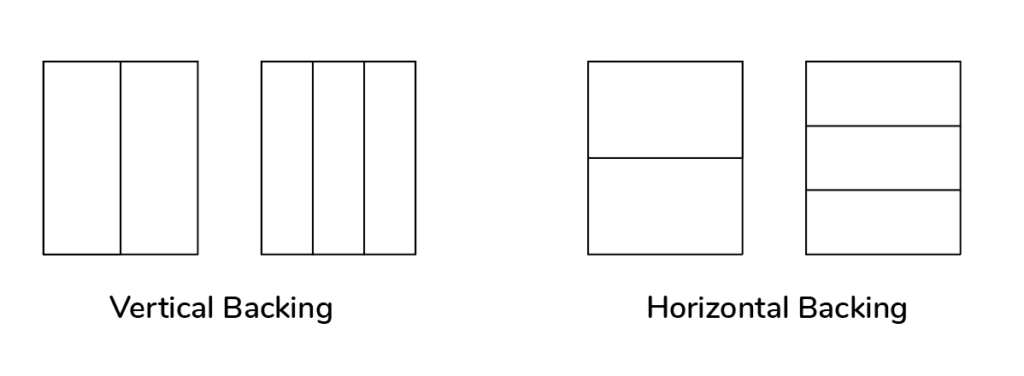
For a vertical backing, you can quickly determine how many pieces of fabric you will need to join by considering the width of your quilt top.
- If the width is <34″, you’ll need 1 piece of fabric. This is because the 42″ width of fabric will be enough for your quilt top, and still allow 4″ of overage on each side.
- For quilt top widths between 34″ and 75″, you’ll need two pieces.
- For quilt top widths between 75″ and 116″, you’ll need three pieces.
Now to determine the total yardage, consider the height of your quilt top, add 8″ for overage, and multiply that by the number of lengths of fabric you need. This will give you the total inches of fabric you need; divide by 36 to see the result in yards.
For a horizontal backing, you use the same process with one key difference — use the quilt top height to determine how many pieces of fabric are needed, and the quilt top width to determine the total yardage.
Let’s walk through an example, using a 50″ x 60″ quilt top:
For a vertical backing:
- Width = 50″ –> 2 pieces of fabric will be needed
- Total Yardage = (60″ + 8″) * 2 pieces / 36 = 3.77 rounded up to 3 7/8 yards
- Cut yardage into two equal pieces ~68″ x WOF and sew together along the long edges.
- Trim backing to 58″ x 68″.
For a horizontal backing:
- Height = 60″ –> 2 pieces of fabric will be needed
- Total Yardage = (50″ + 8″) * 2 pieces / 36 = 3.22 rounded up to 3 1/4 yards
- Cut yardage into two equal pieces ~58″ x WOF and sew together along the long edges.
- Trim backing to 58″ x 68″.
In this example, you can see that the orientation of the backing can make a significant difference in the amount of fabric required. If your backing fabric is a solid or a non-directional print, you may want to do the math for both vertical and horizontal options, and pick the one that uses less!
How to Calculate Quilt Binding
First, you’ll need to know how many total inches of binding you’ll need by calculating the perimeter of your quilt and adding 10″ for margin. Most quilts are rectangular or square, so the perimeter can be quickly found by adding the width and height together and multiplying that result by 2.
Next, calculate the number of WOF strips needed by dividing the total length needed by 39.5″.
(A technical note: 39.5″ is 42″ – 2.5″. I subtract 2.5″ to account for the fabric that is lost when binding strips are joined with diagonal seams. This number corresponds to the width of your binding strip, so if you are using 2.25″ strips, you could divide the total length by 39.75″ (i.e. 42″ – 2.25″). You can make this adjustment if you like, but since we have included a bit of margin in the total length, using 39.5″ as a general rule will get you close enough, and I use 39.5″ for the calculations in my cheat sheet.)
Once you have the number of strips needed, simply multiply that number by the size of your binding strip (i.e. 2.5″) to find the total inches of fabric you need; divide by 36 to see the result in yards.
Let’s walk through an example, again using a 50″ x 60″ quilt top:
- Total Binding Length = (50″ + 60″) * 2 + 10 = 230″
- # of WOF Strips = 230″ / 39.5″ = 5.82 rounded up to 6 strips
- Total Yardage = 2.5″ * 6 strips / 36 = 0.416 rounded up to 1/2 yard
Cheat Sheets!
Again, if you’d rather have an easy reference for both of these calculations, just grab my cheat sheets!
I hope these calculations are helpful. There’s still more than a week to go in this year’s Back to School Blog Hop, with plenty more great tips to come!
Back to School Blog Hop Schedule
- Sept 15 – Geeky Bobbin – Press for Success!
- Sept 16 – Katie Mae Quilts – Storage Solutions From The School Supplies Section
- Sept 17 – Quilting Jetgirl – Make A Design Wall You Can Use Your Hera Marker Against
- Sept 18 – Karen Bolan – How to Get Perfect Tension
- Sept 19 – Devoted Quilter – How To Trim HSTs Without A Specialty Ruler
- You are here! Sept 20 – Sarah Ruiz – Calculating Quilt Backing and Binding Fabric Requirements
- Sept 21 – Andy Knowlton – How To Sew Quilt Blocks With Partial Seams
- Sept 22 – Lisa Ruble – Curved Piecing Doesn’t Have To Be Scary (Or Perfect!)
- Sept 23 – Sarah Goer Quilts – Tips for Piecing Precise Points
- Sept 24 – Faith and Fabric – Spinning Intersections On Four Patch Blocks – The Easy Way!
- Sept 25 – Judit Hajdu – Draw String Bag – For Lunch Or Gym
- Sept 26 – Sugar Sand Quilt Co. – The Care And Feeding Of The Wild Longarm Quilter
- Sept 27 – Hilary Jordan – Quick & Easy Pattern Matching Technique for Quilt Backings
- Sept 28 – True Blue Quilts – Sketch Then Stitch…Better FMQ Through Doodling
- Sept 29 – Sunflower Quilting – A Quilting Tip
- Sept 30 – Slightly Biased Quilts – Perfect Hand Binding Tips


 #saroy1sec #1secondev


I agree that quilt math is satisfying and fun! That said, I know that it’s not for everyone and I’m sure your backing and binding cheat sheets are going to be perfect tools for a lot of quilters. It’s also nice to see the way you think through the process mirrors what I do as well!
I read over all your calculations and thought – this woman loves numbers. When I saw you are an engineer I thought – “Perfect, that makes sense”! Thanks so much for the charts.