Note: Shortly after writing this post, I found out that Backyard Chatter was juried in to QuiltCon this year! Yaaaay! I’m so excited!
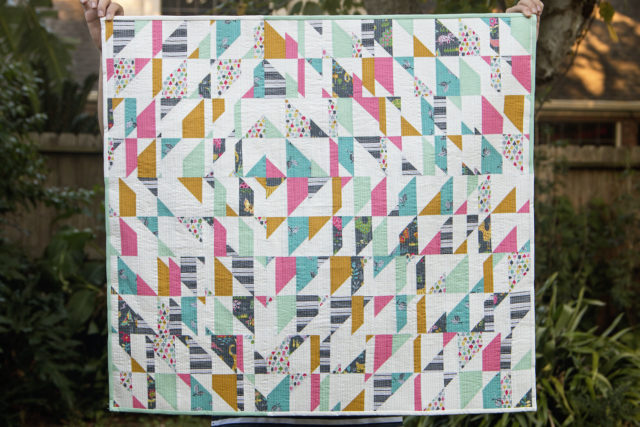
When I posted my Backyard Chatter quilt on Instagram, someone asked me if I might write up a pattern. (And ironically, I asked basically the same question when I saw the piece that inspired me.) I don’t plan to make a pattern, but figured I could oblige with a brief tutorial instead!
First, a few notes on overall planning:
- Since this quilt began with the fat eighths of fabric that I received for the Modern Quilt Guild challenge, all of my sizing decisions were driven by those ~9″ x 22″ pieces of fabric. I used the five pieces provided by the MQG and added two more for a total of seven fat eighths.
- The basis for this quilt is half square triangles, so I knew I needed to start by cutting squares. In order to squeeze every drop out of that fabric, I went with cutting 10 4.25″ squares from each fat eighth. That gave me 70 squares. I then cut another 70 4.25″ squares from 1 yard of white solid.
- Now I had 140 squares, which allowed me to figure out a couple other things. I knew that making half square triangles would take my 4.25″ squares down to 3.75″. (And if they came out a bit bigger than that, I trimmed them to 3.75″ square.) And then once sewn together, they’d finish at 3.25″.
- I decided to make a quilt that was 10 rows tall, which mean my finished product would be 32.5″ tall. 140 divided by 10 means 14 “columns” — which would be 45.5″ (14 x 3.25″) but with all the slicing and dicing, I knew that width would be reduced quite a bit. (In reality, it ended up measuring ~36″ wide.)
Ok! So with those considerations in mind, I jumped in and got to work!
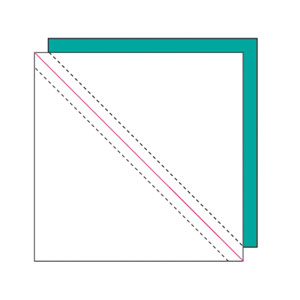
First, I made half square triangles out of all my squares, pairing each print or colored square with a white square. HSTs are pretty easy — you draw a diagonal line on the wrong side of one square, and sew 1/4″ on either side of that. In my graphic above, you draw on the solid pink line and sew on the dotted black lines. Then you cut along the solid pink line, open each unit up and press. Voila! Two HSTs! (Here’s a great tutorial for making HSTs if you need more guidance. I refer to Alyce’s HST measurement charts quite regularly!)
One important note: if you plan to lay out the quilt top like I did (i.e. with diagonals running in different directions) AND you want to keep any directional prints all facing the same way, you’ll need to make some HSTs with the seam running from top left to bottom right, and some with the line running from top right to bottom left. Take time to think it through and draw your lines accordingly!
Once I finished this step, I had 140 HST units. I trimmed them all to be exactly 3.75″ square, and then I was ready to move on.
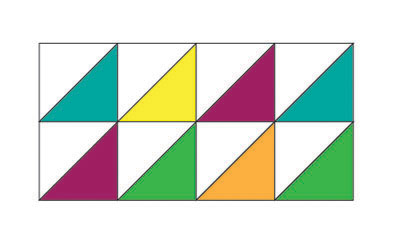
Next, I sewed my HSTs together in blocks of 2 rows and 4 columns, with each diagonal seam oriented in the same direction. I also took care to make sure the directional prints were all facing up. (With 140 HSTs total, I was able to make 17 2×4 blocks and had 4 left over that I made into a single 4×4 block.)
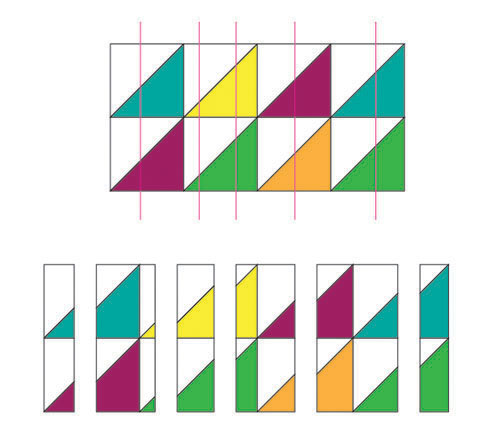
From there, it was time to get serious! Eek! I took each of those 2×4 chunks that I had just finished sewing together so nicely…and sliced them apart again. I did this pretty randomly, making 4-5 vertical cuts per unit. Just make sure not to cut too close to the vertical seams that are already there! (I stayed at least 1/2-3/4″ away from those.)
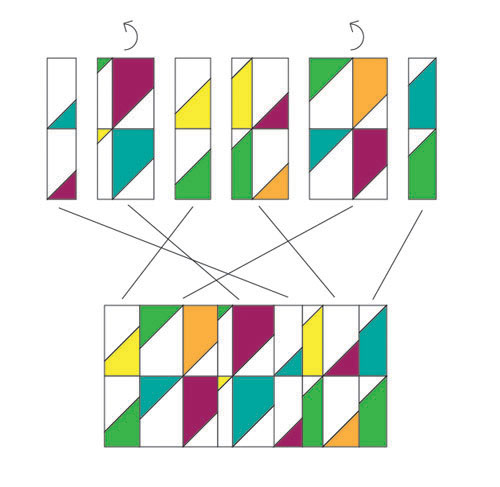 Now things get REALLY fun — you get to rearrange all your slices! My diagram shows how to rearrange one unit within itself, but in reality I basically threw all my dozens of slices into one big pile and started laying them out from there. Flip some 180 degrees so that sometimes the color is on top and sometimes it’s on the bottom. And play around with layout! I chose to form a sort of “shattered diamond” look with the focal point off-set from the center of the quilt but there are certainly other options.
And then? Sew it all back together again! The sides of the quilt top will be a bit ragged since the slices were all different widths, but I went ahead and basted the quilt and quilted it (I chose vertical matchstick quilting) before finally squaring it up. Add binding (I chose to have a little fun with a two-tone binding aligned with the quadrants of the quilt) and voila! Done!
p.s. I’m doing a 31 day blog writing challenge!


 #saroy1sec #1secondev


Great tutorial, Sarah! Would you consider linking it up to Tips and Tutorials Tuesday?
The QuiltCon news is so exciting! It is a beautiful piece. Also, loving the 31 days of blogging!
Thanks! I hope I can keep it up — it’s only day 16 and I’m starting to run out of ideas…
Cool! This is my favorite of your original design quilts, I think.